This one is for my partner in the Fab Little Treasure Swap over on Flickr and a few have asked for some measurements.
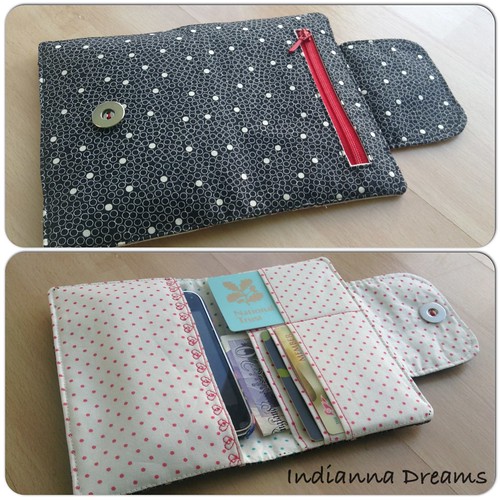
I wanted to use this tutorial from Liz, Confessions of a Fabricoholic for an Organizer Wallet as it is a great pattern, very clearly written and ample photos. I needed mine to be a finished size of 6" by 8" when open flat with a zip on the outside and a padded pocket on the inside.
In general the wallet is made in 2 pieces, side A the outer and side B the inner. They are then stitched together right sides together, turned through and then top stitched. I always cut my interfacing .25" smaller all around so there is less bulk in the seam.
Here are a few measurements and hints on how to adapt the 2 tutorials I used.
NOTE...IF I EVER MAKE ANOTHER OF THESE I WILL ADD SOME MORE PHOTOS,
SIDE A (Outer)
6.5" x 8.5" - black spot outer
6.5" x 8" - red spot pocket lining,
6" zip
Sew this side using the instructions given for inserting a zipper, with fabrics right sides together.
Fold the red spot pocket lining in half behind the zip to complete the pocket and baste in place.
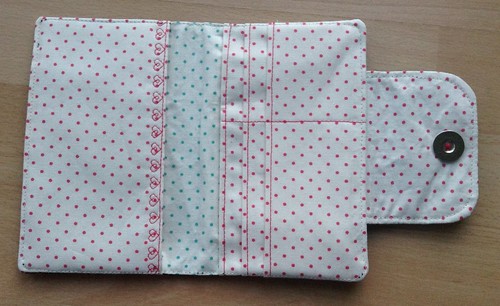
SIDE B (Inner)
6.5" x 8.5" - wallet inner- green spot
6" x 8" - medium interfacing ironed onto wallet inner
6.5" x 7" - phone pocket - red spot
6"x 3.25" fleece ironed on to the phone pocket when folded in half. You can top stitch this or try one of those fancy stitches on your machine that you never use....hearts for me!
Then for the card pocket I switched to using this bi-fold wallet tutorial by Mel @All Wrapped Up because I liked the fact the card pockets were all one piece and none of the fabric back would be visible.
6.5"x 16" for pockets
6" x 3.25" interfacing, ironed between folded pocket back, iron on 0.25" from one end of 16" pocket piece.
- concertina fold and iron around an old credit card....guesstimate and then cut 2 pieces of interfacing to slot in between, roughly 6.5" x 2.25", iron in place, top stitch 3 edges.
Sew the line to divide the pocket 3.75" from the edge and then baste both pockets to Side B the pocket inner.
I made my tab to fasten the wallet a bit bigger too, 4"x3" then rounded the outer corners and interfaced, and added a magnetic fastener.
Follow Liz's finishing instructions from the Organizer Wallet tutorial.
Hey presto.....a lovely sized phone wallet, with places for notes, cards and coins!
Let me know if you follow these instructions and there are any mistakes, I wasn't planning on writing this up in so much detail when I made it!!

Hmm love the wallet.
ReplyDeleteIt's gorgeous Helen!
ReplyDeleteLove it and I'm definitely going to copy you. Di x
ReplyDeleteThis is gorgeous Helen, I love it, lucky partner, you are really going to town on us swap buddies this month! : )
ReplyDeleteI am so embarrassed to have sent you the left handed wallet now I've seen this
ReplyDeleteLovely wallet but I shall not be giving it a try just yet - already too many unfinished things to do right now!
ReplyDeleteLovely wallet. Mine is looking a bit tattered so will keep this in mind when I do make another. Thanks for sharing.
ReplyDeleteThis is looking great :)
ReplyDeleteThis looks amazing! I especially love the interior fabrics you've chosen.
ReplyDeleteWhat a fun project. I know you said this is for a swap, but I just love having something handmade that I use on a day-to-day basis!
ReplyDeleteGreat job! What a great gift project idea! Thank you so much for sharing!
ReplyDeleteThanks for this, lovely purse and links. I've added both sites to present project list :)
ReplyDeletelove it :D
ReplyDeleteThis wallet looks really sweet! :))
ReplyDelete